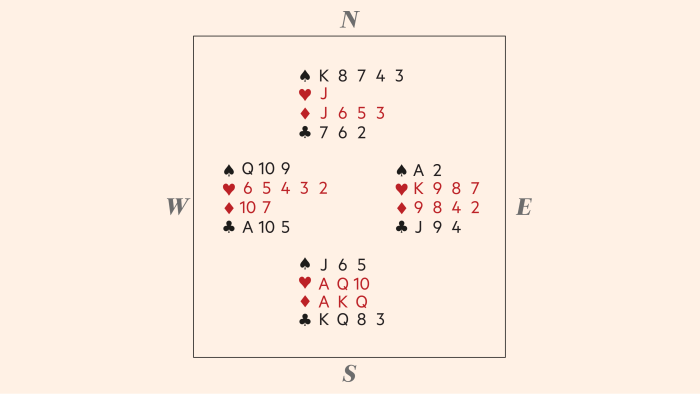
Make pragmatic decision to bring home unlikely game contract

Roula Khalaf, Editor of the FT, selects her favourite stories in this weekly newsletter.
Contracts with seemingly little chance of success should be approached optimistically; sometimes, in this troubled world, things go right.
Bidding
Dealer: East
North/South game
North used a transfer, which South completed, before bidding 3NT. Some Souths opted to bid 4S but, with no ruffing values in the hand with three trumps, this was unlikely to be correct.
West led 6♥; most East players did not cover with K♥. There seems no coherent line to the contract, and most declarers attempted to develop tricks from disparate sources. Those declarers who tried a club to hand lost a top honour to West, and faced a switch to a diamond. Since they could not lead again from the table, this seemed almost pointless. Declarer now requires spade tricks; many cashed ♦AKQ and tried a spade to dummy’s king. This lost to East’s A♠ and the hand was over. Pragmatically, spades must be played on, and declarer’s main hope should rest on either opponent holding a doubleton A♠.
At trick 2, declarer could try a low spade from dummy but, whenever he does try it, he must resist releasing his K♠ until it, hopefully, scores the trick. That provides three spade tricks and if, when East wins A♠, he errs and returns a heart, declarer will take 11 tricks. Not only is this the best line to attempt to bring home the game contract but, should it succeed, it will score a top result for your side.
Read Paul’s previous Bridge columns at ft.com/bridge-card-game
Comments